Linux
Finding out which Linux Version running
cat /etc/issues
cat /etc/os-release
hostnamectl
cat /etc/upstream-release/lsb-release/etc/issues: Linux Mint 21.1 Vera \n \l/etc/os-release: more mint details/etc/upstream-release/lsb-release: Ubuntu infolsb-release: Here I will collect my general Tips on Linux`
Directories and permissions
place additional package managers and executables in and config files.
~/.local/
~/.config/
Pretty Printing Path with each entry in new line as alias ep
alias ep='echo $PATH | tr ":" "\n"'Generate Random strings
thanks to How-to-Geek Generating 20 character long random strings.
or
On Mac prepend it with LC_CTYPE=C, like
Setup ssh Key connectivity
Install openssh_server
Generate a new ssh key pair
preferably store it in /home/<user>/.ssh/<keyname> and append it into the authorized_keys File. Use the -N "" to avoid being prompted for a passphrase if desired.
Update the sshd configuration to allow key based authorization. My preffered configuration checks the users .ssh directory for and authorized_keys File and also checks for a file per user like /etc/ssh/authorized_keys/<user> Depending on the Firewall settings I sometimes have to run the openssh-server on a different port than 22
Lastly copy the private keyname file to the machine you want to use to connect from. The private keyfile is the key to access your host use caution and encryption when to save or share it.
Setting up Debian
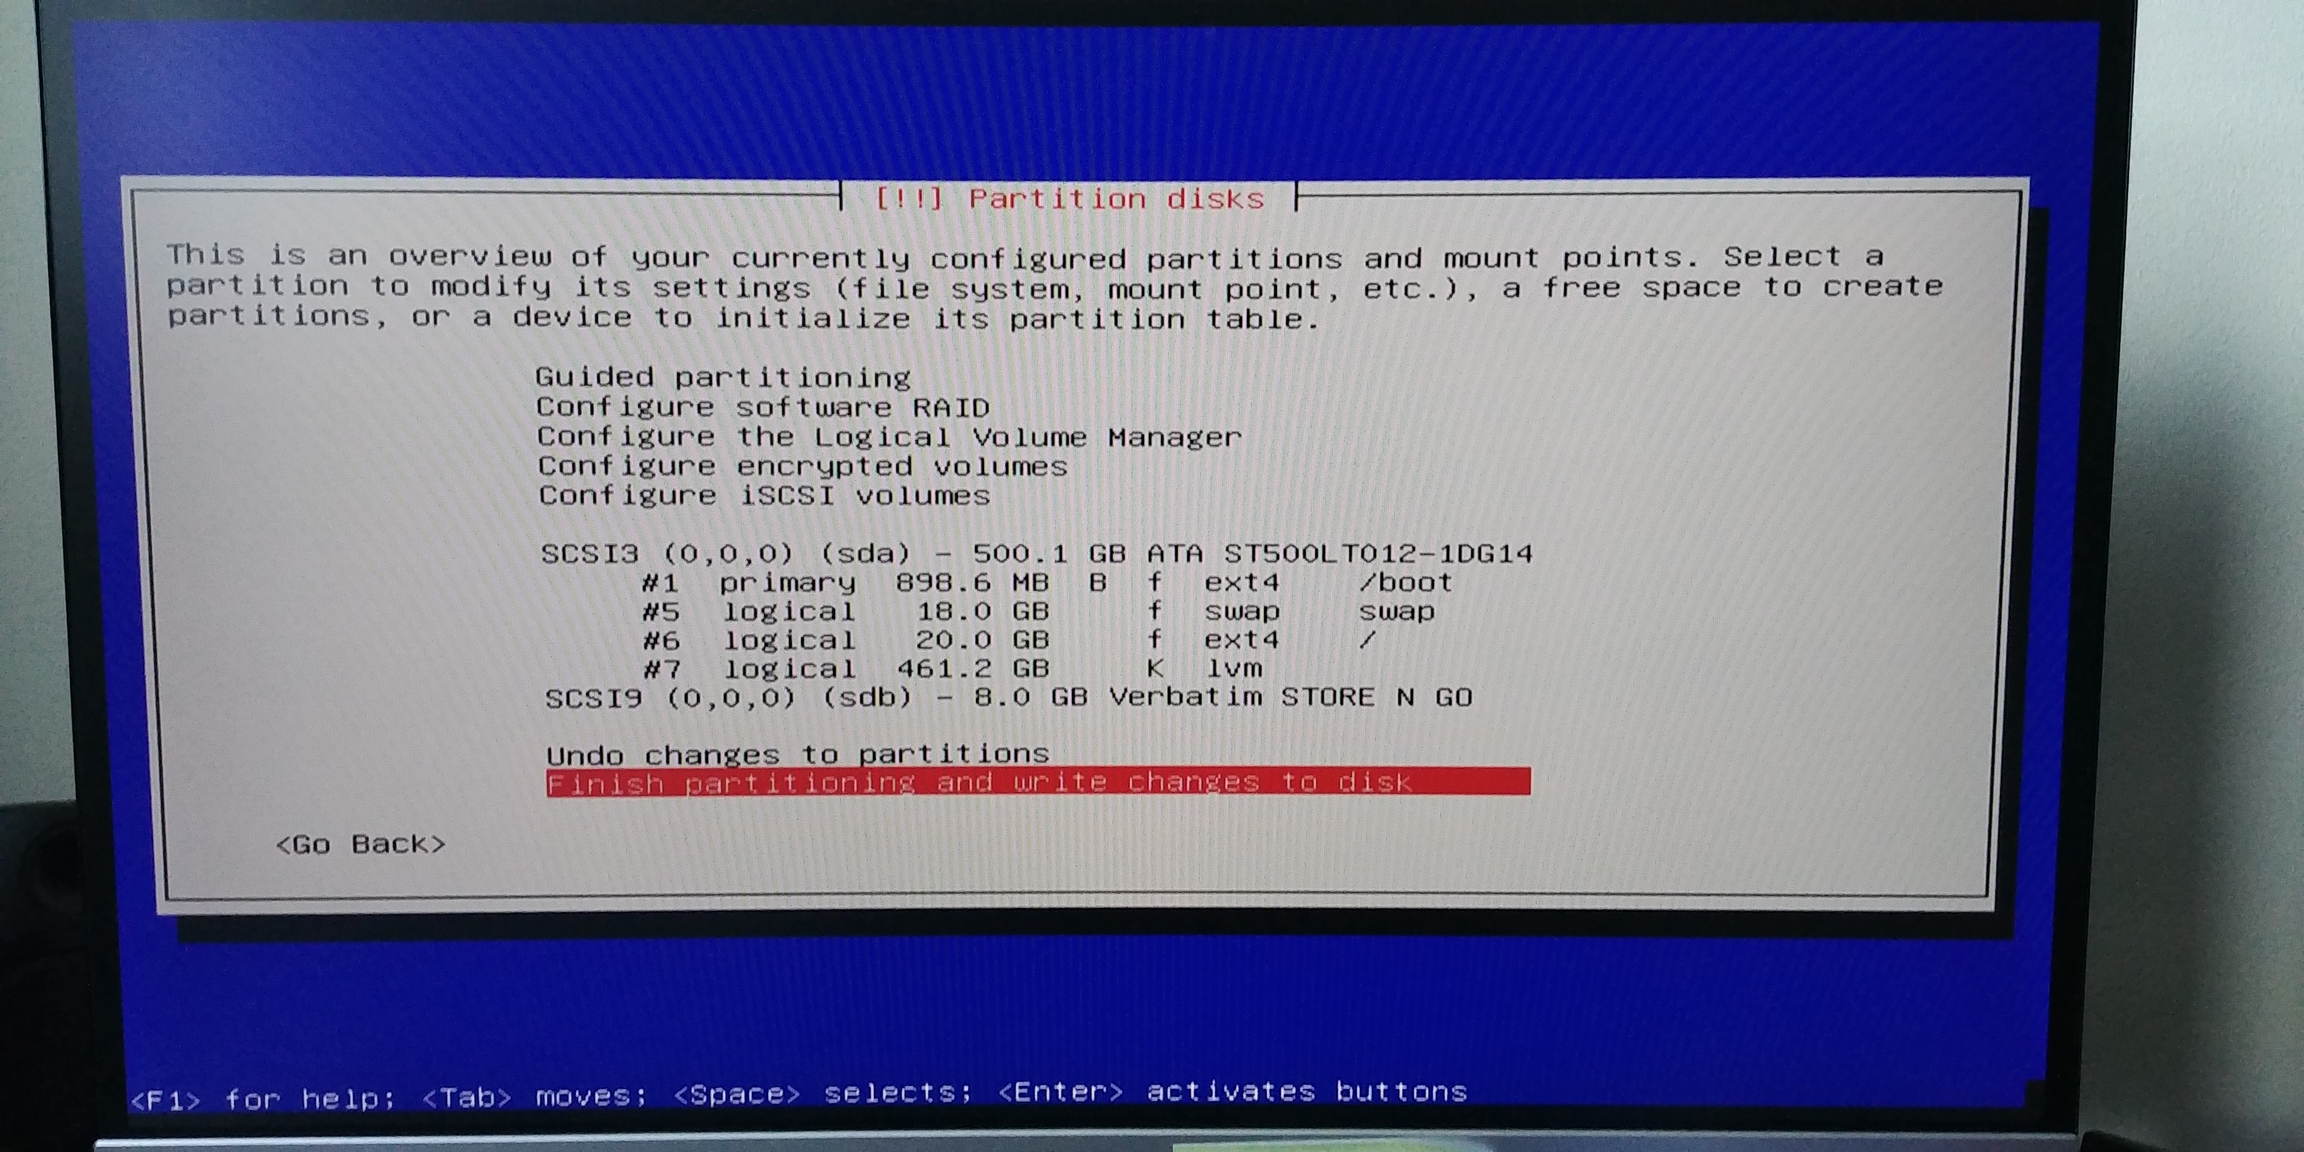
I used the debian-9.8.0-amd64-netinst.iso image. First I highlighted the Install option to avoid using the graphical installer. This is because I had issues in an earlier install when I was monitoring the log output and then switching back to the first console. Then I hit tab to add and additional boot parameter netcfg/disable_autoconfig=true. This was because when I used automated Network Configuration, it defaulted to IPv6 and then froze when it tried to copy the apt mirrors because it didn't fell back to IPv4. I also used the following Partioning Table setup.

To see the log output press Ctrl+Alt+4 to switch back press 1 instead or use 2or3 to start a console terminal
See also
Debian-Installer 5.1.7. The Boot Screen
Debian-Installer 5.3.2. Debian Installer Parameters
Debian-Installer 6.1. How the Installer Works
LVM
LVM stands for Logical Volume Management and is used to create, display and manage Physical Volumes(pv), Volume Groups (vg), and Logical Volumes (lv)
Installing Xen
As described in Xen Getting started
/dev/sda7 differs from the turorial due to my different partion tables I re-installed Linux-Mint on a setup with existing LVM settings. I mounted a data volume in /etc/fstab with lvdisplay revealed the $ LV Path as /dev/vg-01/data01
see man mount for more settings
_netdev
nofail
x-systemd.idle-timeout=600
timeo=50
retrans=2
NFS Issues
Make sure the /etc/exports file on the nfs server has the right ip addresses. They did not get updated when the ip address of the server changed due to a change of my ISP. The shared folder on the NasDrive needs to have nfs Permissions:
- Client:
10.0.0.*
+ Privilege:
Read/Write
* Squash:
Map all users to admin
* Asynchronous:
No
* Non-privileged port:
Denied
* Cross-mount:
Allowed
Install nfs-common to mount nfs
In /etc/fstab mount it with, make sure to ues tabs for separation (no spaces!)
Mount Usb stick
Find device location with fdisk and look for the flash drive, use the exfat-fuse if the stick is exfat formatted. To find out about the filsystem run blkid, then make the mount point and mount the drive.
rsync
Copying folders recursively with rsync
rsync --recursive --progress -v source/path destination/path
Mountpoint android phone
The phone is mounted to the Computer through mtp and the SD-Card is in the phone
ls -lah /var/run/user/1000/gvfs/mtp:host=%5Busb%3A002%2C003%5D/SD\ card
Change screen brightness
Install xbacklight and set screen brightness to 60%
Install deb package
run sudo dpkg -i <deb-File>.deb
Check installed Ubuntu Version
For Linux Mint
Printing from the commandline
Firewall
Use ufw to allow firewall request for port and protocol.
Last updated